Custom Minecraft Login Screen

APRIL SALE 30% OFF! ENDS SOON!

Creating a Custom Minecraft Login Screen with Game Launcher Creator V3 (Developer Edition) is an easy thing to accomplish. You can design and create your own login screen directly inside and to work with, your custom Minecraft launcher.

Here, we will show you how you can do it.

Create Your Design Artwork

First thing is first and that’s deciding (or creating) your design and how you want your custom Minecraft login screen to look.

You will notice, that when you use GLCV3 to create your Minecraft launcher, that there is a developer-only option. Let’s take a look at that first, so you know what fields you will require for the login screen.

Here is a screenshot of the custom Minecraft login screen fields required (Note: you will require the Developer Edition of GLCV3 in order to make this).

Minecraft Login Fields

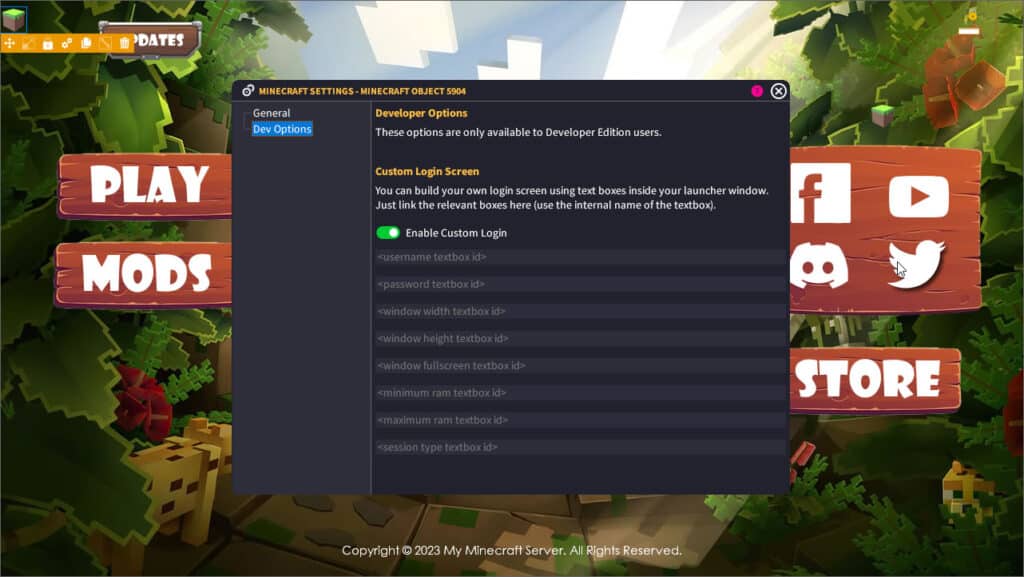
The fields required are

  • Username
  • Password
  • Window Width
  • Window Height
  • Window Mode
  • Minimum RAM
  • Maximum RAM
  • Session Type


Minecraft Login Fields

We will explain these fields and what they do. All of these fields are required in order to login.

Username

This is the user’s login username, whether it’s for Mojang, Offline or Microsoft. It will be required.

Password

This is the user’s password to login to their Mojang or Microsoft account. It can be left blank for offline login.

Window Width

The user must specify a width for the window. We recommend 800 as the default.

Window Height

The user must specify a height for the window. We recommend 600 as the default.

Window Mode

This must be an answer as to whether the user wants to launch Minecraft in fullscreen mode. Options are ‘true’ or ‘false’. True will launch in Fullscreen. False will launch in Windowed Mode.

Minimum RAM (in MB)

The user must specify the minimum amount of RAM to use in order to launch Minecraft to your server. Dependent on how many mods you have, a default value of 512 should be enough. This is in megabytes.

Maximum RAM (in MB)

The user must specify the maximum amount of RAM to use in order to launch Minecraft to your server. Dependent on how many mods you have, a default value of 1024 should be enough. If your server has a lot of mods, you can increase this value. 1024 is 1GB of RAM, so 2048 would be 2GB RAM. The user must ensure they have more RAM in their system than what they specify here.

Session Type

A session type must be specified in order to launch the user into your Minecraft server. The options are Offline, Mojang or Microsoft. This specifies the login type for the session. We recommend having ‘Microsoft’ as the default.

Just a note on Session type. As of 2023, Mojang has officially been shut down by Microsoft and all Mojang accounts have been ported over to the Microsoft login. So it’s best not to give the user a Mojang option anymore. Just stipulate Microsoft as the session type. Offline can still be used.

The Custom Minecraft Login Screen Design

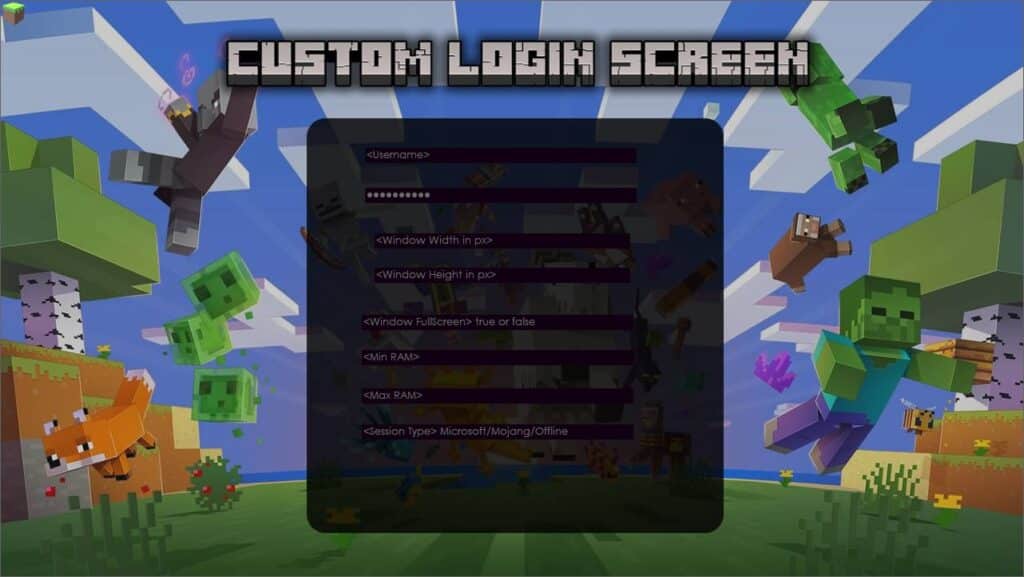
So now we know what fields we need, let’s design our initial login screen. In our GLCV3 Minecraft launcher, we are going to have a login page, which is dedicated just to logging in and launching into our server. We will design the page at 1280×720 resolution.

We have created our login screen using Photoshop, you can use any graphic editing software like GIMP, Fireworks, Illustrator or even MS Paint to create your own.

If you don’t fancy creating your own, you can simply just design your login page inside the GLCV3 editor itself.

Blank Minecraft Login Page

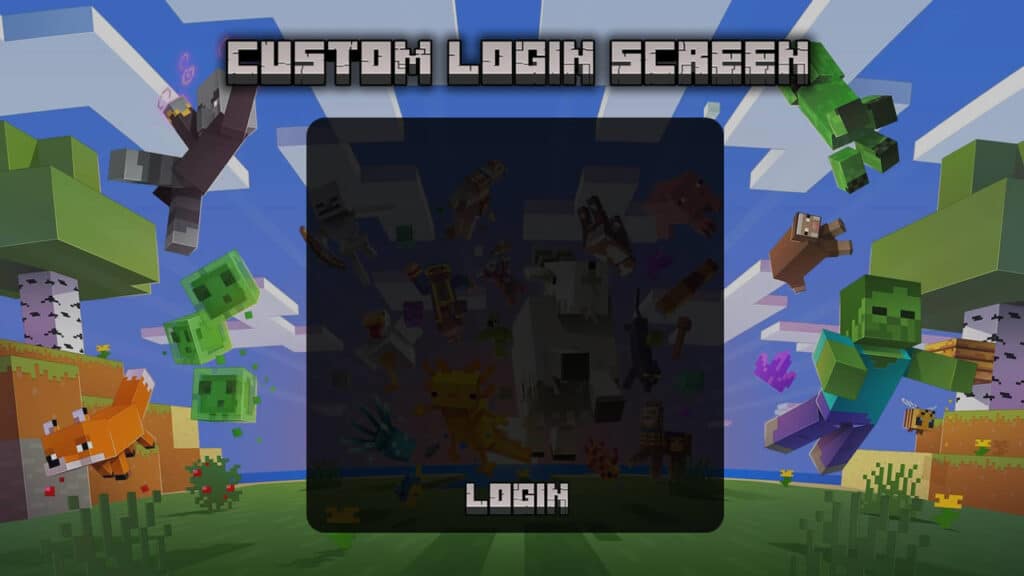
You will notice in our design mockup for the custom Minecraft login screen, we do not have any text fields. That’s because we design them inside Game Launcher Creator V3 itself.

So now we need to import this design to our custom launcher inside GLCV3.

Import Design into GLCV3

First, create your page that you will use for your custom Minecraft login. Once you have created the page inside GLCV3, right-click on the page and select ‘Edit Page’. You will then bring up the Page Settings dialog. Select Background, select ‘Image’ as the Background type then go to down to Browse Launcher Library…

Minecraft Login Page Settings

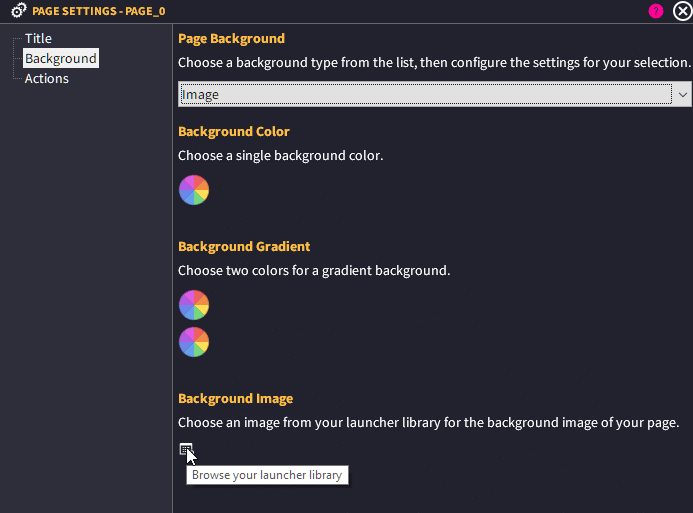
When you click this button, it will load up your launcher library. This is what contains all the graphics to use for your custom launcher. Inside here, we need to import our design image so go ahead and click the ‘Import’ button and import the design.

The image should now be the ‘background’ of your custom Minecraft login page.

Designing the Login Text Fields

You need to do this process inside the GLCV3 Editor. With the Developer Edition, you have access to the ‘textbox’ objects and they will be in the object panel on the right. Simply double-click the ‘Regular TextBox’ object to insert a new textbox object.

Once you have it inserted into your login page, position the object then select the settings cog which will bring up the settings for this object.

Default Text Box Settings

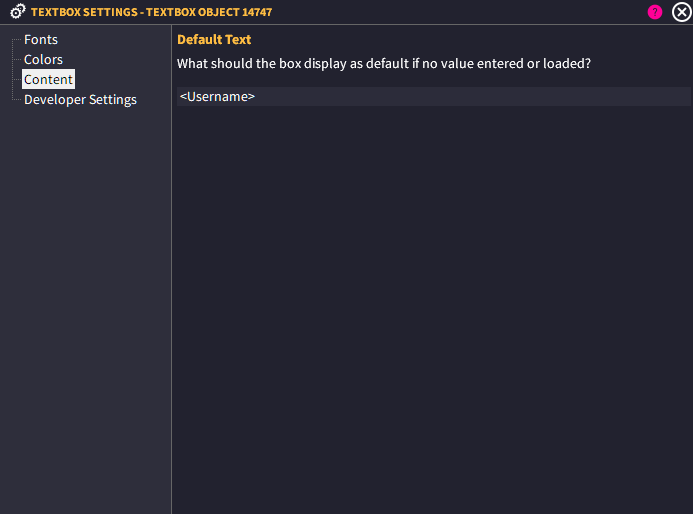
You can configure your text box design here such as colors and fonts to use for the textbox.

For the ‘Content’ section, we just put a default text of <username>. You can put whatever you want in here to tell the user this is where their username goes.

An interesting feature of GLCV3 Developer Edition is the ability to save and load values from a local INI file. If the INI file doesn’t exist, GLCV3 will create it. So you can click on ‘Developer Settings’ and then select the ‘Enable INI Save/Load’ option and then fill out the details.

Save and Load Minecraft Login Data

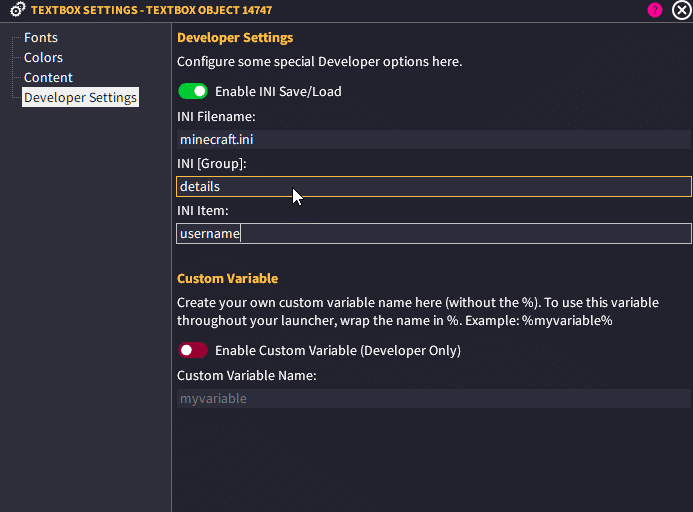
You can use the same details for all the textbox object except INI Item, this must be unique to whatever field you are editing. For this example, this is the Username box, so the INI item needs to be ‘username’ or something unique.

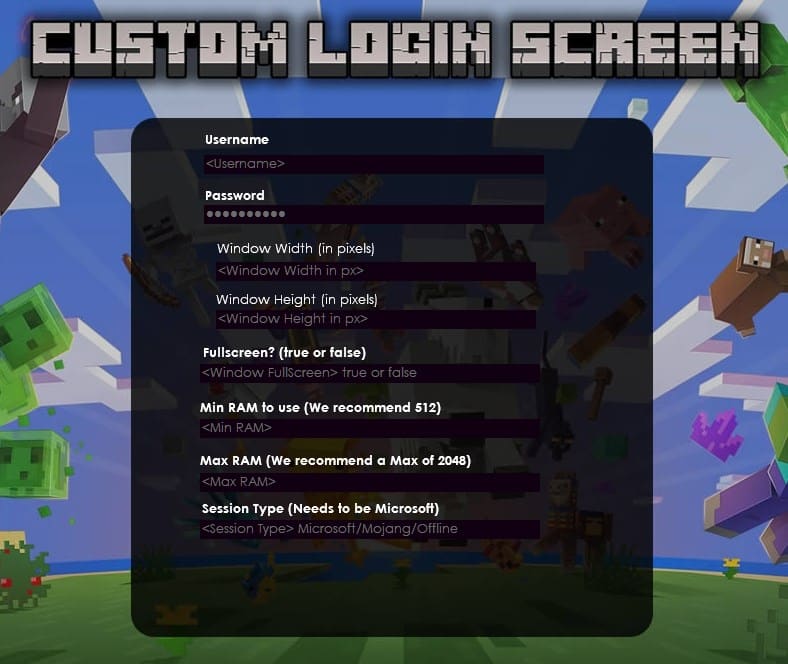
You should now repeat the process for ALL the required fields we covered earlier in this guide, with the exception of the Password field which you should use the ‘Password TextBox’ object instead of ‘Regular TextBox’ object. In the end, your login page should now look something like this…

Custom Launcher Login Page in GLCV3

It looks good, but it needs some text labels to make it look better.

You can add these by inserting ‘Left String’ ‘Center String’ or ‘Right String’ objects in GLCV3.

This is how we configured ours…

Login Screen Labels

Once you have done this, you can simply follow the Custom Minecraft Launcher tutorial to connect directly to your server.

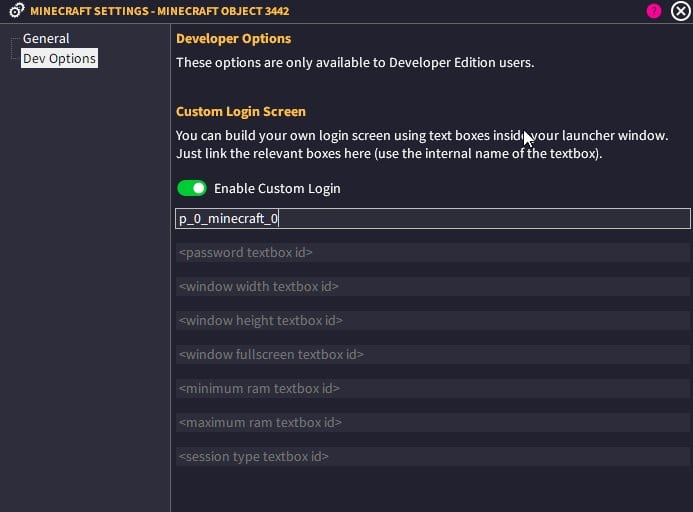
Configuring the Developer Options

Once you have followed the instructions on how to setup your Minecraft server to the launcher, you should go back to the Minecraft object settings and stipulate that you want to use a custom Minecraft login screen. You can do this by selecting the ‘Dev Options’ setting and clicking ‘Enable Custom Login‘.

Custom Minecraft Login Screen Options

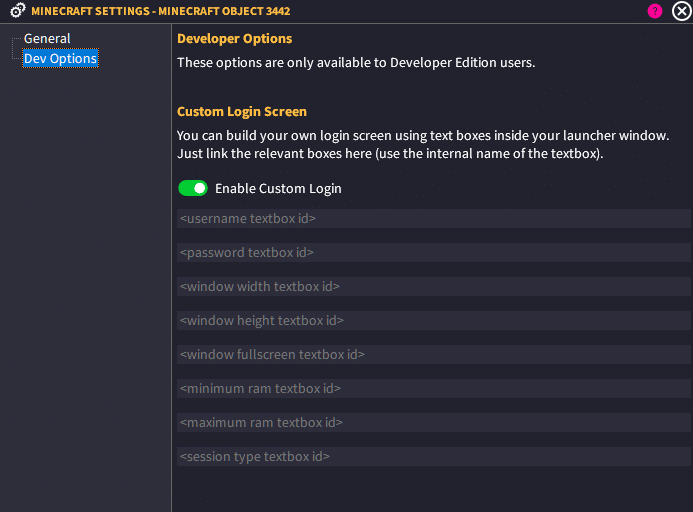
Now you need to return to the editor and copy the Internal Name of each text field and paste it in the Dev Options dialog.

So for an example, our username box. We go into the Editor, select the Username textbox and on the right hand property panel, we select the internal name, right-click and hit copy.

Select Textbox Internal Name

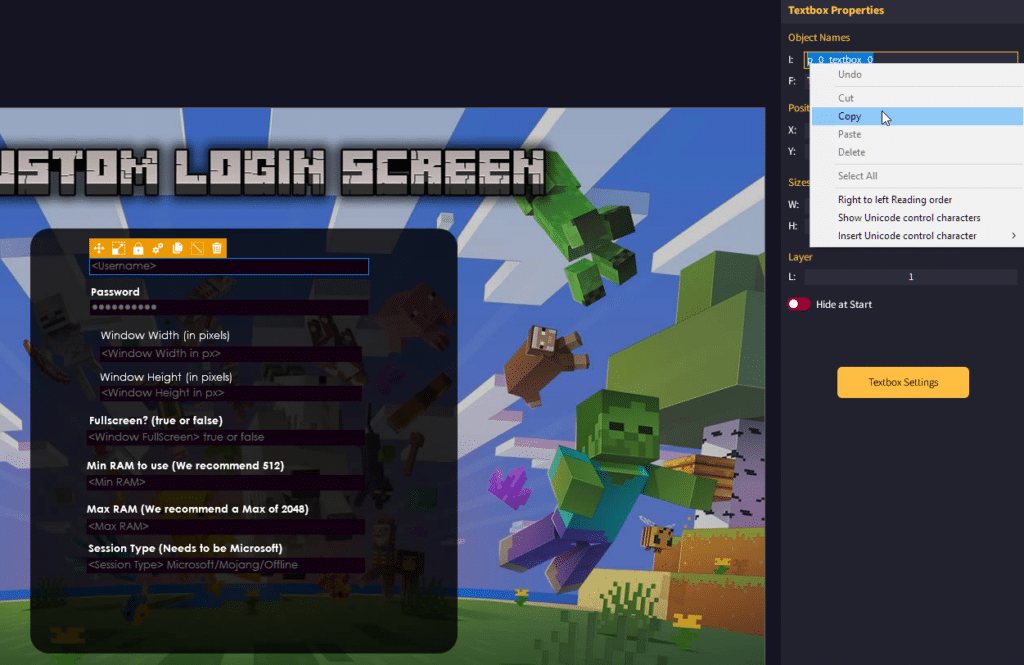
Then return to the Minecraft Object settings and click on Dev Options, go to the username field and paste in the internal name of the textbox…

Insert Internal Name into Custom Dialog

Repeat this step for all the textbox fields and you should be good to go.

The only step left to do is create your ‘login’ or ‘launch button, which is covered in the above custom MC launcher tutorial.

Once done, build your custom launcher and send it to your friends, players or link it on your website. You now have your very own custom Minecraft login screen!

Final Notes

You can purchase the Gamer Edition of GLCV3 which allows you to create a custom Minecraft launcher from here. However, this edition comes with a default login screen that you cannot change. If you want to create your own customisable login screen like above, then you will need the Developer Edition of GLCV3.

You can upgrade from Gamer at any time, or you can just outright purchase the Developer Edition of GLCV3 and get the Minecraft Plugin from the ByteBox Media store.

Share This Post

Are you a Gamer?

Build a custom launcher for your favourite games. Select your game below…

Are you a Game Developer?

Build a custom launcher and patch update system for your game developments. Select your engine below…

Game Launcher Creator V3

Create your own Custom Minecraft Launchers

Copyright Notice

Copyright © 2017-2023 ByteBox Media Ltd. All Rights Reserved.

The software, Game Launcher Creator (hereinafter referred to as ‘GLCV3‘), and all its intellectual property rights are owned by ByteBox Media Ltd., a UK Limited Company, unless otherwise specified.

Disclaimer for Third-party Plugins: Some plugins integrated or compatible with GLCV3 are developed by third parties not affiliated with ByteBox Media Ltd. ByteBox Media Ltd. neither offers any warranties for these third-party plugins nor takes responsibility for any potential copyright or trademark violations stemming from them.

Content Disclaimer: GLCV3’s base software package does not include any content, plugins, graphics, videos, or other material not explicitly owned or licensed by ByteBox Media Ltd. Users are encouraged to verify rights for any additional content they integrate.

File Integrity Assurance: GLCV3 is designed to not modify, infringe, or violate any third-party software files, including but not limited to any third party game files.

It respects the integrity of all game files in its standard operation.

Non-Affiliation Disclaimer: ByteBox Media Ltd. and GLCV3 are neither affiliated with nor endorsed by Microsoft, Rockstar, Mojang, or any other company not explicitly mentioned in this notice. Furthermore, ByteBox Media Ltd. does not condone or promote any illegal activities, including but not limited to hacking, unauthorized distribution, or modification of files, through the use of GLCV3. Users are advised to respect the intellectual property rights of others and use the software in a legal and ethical manner.

For any further inquiries or clarifications, please contact the legal team at ByteBox Media Ltd.

By using GLCV3, users acknowledge and agree to the terms outlined in this notice. ByteBox Media Ltd. reserves the right to modify these terms at any time without prior notice.

Privacy Policy

Effective Date: 25th August 2023

This Privacy Policy describes how your personal information is collected, used, and shared when you visit GameLauncherCreator.com.

INFORMATION WE COLLECT
Log Files: Like many other websites, GameLauncherCreator.com makes use of log files. The information inside the log files includes internet protocol (IP) addresses, type of browser, Internet Service Provider (ISP), date/time stamp, referring/exit pages, and the number of clicks. This information is used to analyze trends, administer the site, track user’s movement around the site, and gather demographic information.

Cookies and Web Beacons: GameLauncherCreator.com uses cookies exclusively for Google Analytics to understand and save user preferences for future visits and compile aggregate data about site traffic and site interactions to offer better site experiences and tools in the future.

HOW DO WE USE YOUR INFORMATION?
We use the information we collect from you to:

Track and analyze website usage to improve our website’s offerings. Understand and analyze the preferences and behavior of our visitors.

THIRD-PARTY LINKS
Occasionally, at our discretion, we may include or offer third-party products or services on our website. These third-party sites have separate and independent privacy policies. Therefore, we have no responsibility or liability for the content and activities of these linked sites. Nonetheless, we seek to protect the integrity of our site and welcome any feedback about these sites.

Particularly, the ByteBox Media store is linked to our website, which has its own privacy policy. We recommend reading their privacy policy if you choose to access the store.

CONSENT
By using our website, you hereby consent to our privacy policy and agree to its terms.

CHANGES TO THIS PRIVACY POLICY
GameLauncherCreator.com may update this privacy policy from time to time in order to reflect changes to our practices or for other operational, legal, or regulatory reasons. We encourage users to frequently check this page for any changes.

CONTACT US
For more information about our privacy practices, questions, or if you would like to make a complaint, please contact us by email at support@bytebox.media

Website Terms of Use

Effective Date: 25th August 2023

Welcome to GameLauncherCreator.com, operated by ByteBox Media Ltd. By accessing or using our website, you agree to be bound by these Terms of Use. If you do not agree with these terms, please refrain from using our website.

DEFINITIONS
“Website” refers to GameLauncherCreator.com.
“User,” “You,” and “Your” refer to the person, company, or organization that has visited or is using the Website.
“ByteBox Media Ltd,” “We,” “Our,” and “Us” refer to ByteBox Media Ltd and its successors and assigns.

WEBSITE USE
You agree to use the Website for lawful purposes only.
Unauthorized use of this Website may give rise to a claim for damages and/or be a criminal offense.
From time to time, the Website may also include links to other websites. These links are provided for your convenience and do not signify endorsement of the linked website(s). We bear no responsibility for the content of the linked website(s).

SOFTWARE PURCHASE AND TERMS
Any purchase of software from GameLauncherCreator.com will be governed by the terms and conditions set forth in the ByteBox Media store, which can be found at https://byteboxmedia.store/terms/. By purchasing, you explicitly agree to those terms and conditions.

INTELLECTUAL PROPERTY
The content, design, graphics, and other materials related to this Website are protected under applicable copyrights and other proprietary laws. Unauthorized use of this material may violate copyright, trademark, and other laws.
You may not modify, copy, reproduce, republish, or distribute any content on this Website without express written permission from ByteBox Media Ltd.

DISCLAIMERS
The content on the Website is provided “as is” and without warranties of any kind, either express or implied.
ByteBox Media Ltd does not warrant or make any representations regarding the use or the results of the use of the content on the Website in terms of its correctness, accuracy, reliability, or otherwise.

LIMITATION OF LIABILITY
ByteBox Media Ltd will not be liable for any damages or injury, including but not limited to, special or consequential damages that result from the use of, or the inability to use, the materials in this Website.

CHANGES TO TERMS OF USE
ByteBox Media Ltd reserves the right to update or modify these Terms of Use at any time without prior notice. Your use of the Website following any such change constitutes your agreement to follow and be bound by the updated Terms of Use. We encourage users to frequently review the Terms of Use to stay informed.

GOVERNING LAW
These Terms of Use shall be governed by and construed in accordance with the laws of the United Kingdom. Any disputes relating to these terms shall be subject to the exclusive jurisdiction of the courts of the United Kingdom.

CONTACT US
For any further inquiries, concerns, or clarifications regarding these Terms of Use, please contact us by email at support@bytebox.media