Whether you’re a seasoned miner or just starting to explore the blocky universe, mod launchers for Minecraft are your gateway to customizing and enhancing your Minecraft experience. These tools allow you to easily manage and install mods, opening up endless possibilities for gameplay enhancements, new features, and even entirely new worlds to explore. In this article, we’ll delve into the nuts and bolts of Minecraft mod launchers, explore the benefits of using them, and take a closer look at some of the best options available.
Mod launchers are specialized software designed to simplify the process of managing and installing mods for Minecraft. Mods, short for modifications, are user-created content that alters or adds to the game’s original features. These can range from simple cosmetic changes, like new skins or textures, to complex additions such as new biomes, mechanics, and gameplay elements. A mod launcher acts as a bridge between the vanilla game and these mods, ensuring compatibility and streamlining the installation process. Instead of manually placing files in specific directories, which can be error-prone and time-consuming, a mod launcher automates much of the work. It provides a user-friendly interface where you can browse, install, and manage your mods with just a few clicks.
Mod launchers also handle the dependencies and conflicts between different mods. Many mods require specific versions of Minecraft or other mods to work correctly. A good mod launcher will automatically resolve these dependencies and alert you to any conflicts, making it easier to create a stable and enjoyable modded Minecraft experience.
Why Use Mod Launchers for Minecraft?
Ease of Use
The primary advantage of using a mod launcher is convenience. Installing mods manually can be a daunting task, especially for beginners. A mod launcher simplifies this process by providing a straightforward interface where you can easily add, remove, and update mods.
Compatibility Management
Mods often require specific versions of Minecraft or other mods to function correctly. A mod launcher takes care of these dependencies, ensuring that you have the right versions installed and that they are compatible with each other. This reduces the risk of crashes and bugs, providing a smoother gameplay experience.
Organized Mod Management
With a mod launcher, you can keep your mods organized and easily switch between different sets of mods. This is particularly useful if you like to experiment with different combinations or if you play on multiple servers with varying mod requirements.
Automatic Updates
Many mod launchers include features that automatically check for and install updates for your mods. This ensures that you always have the latest versions with the newest features and bug fixes without having to manually track and download updates.
Community and Support
Mod launchers often come with access to vast libraries of mods and active communities. This makes it easier to discover new mods and get help if you encounter any issues. Community ratings and reviews can also guide you towards the best and most reliable mods.
Using a mod launcher for Minecraft streamlines the process of modding, making it accessible to everyone from novice players to seasoned veterans. By managing compatibility, updates, and organization, mod launchers provide a hassle-free way to enhance your Minecraft experience.
Building a Custom Minecraft Mod Launcher
Creating a custom mod launcher can be a rewarding endeavour for those with a knack for coding and an interest in game development. Whether you’re a developer looking to craft a bespoke solution or a Minecraft enthusiast wanting full control over your modding experience, building a custom mod launcher allows for unparalleled customization and functionality. However, the process can be complex and time-consuming. Alternatively, software like Game Launcher Creator provides a user-friendly, drag-and-drop solution that simplifies this task significantly. Let’s dive into the pros and cons of coding your own launcher versus using a tool like Game Launcher Creator.
Building a custom mod launcher from scratch involves a series of steps that range from designing the user interface to handling file management and ensuring compatibility with different mods. The main appeal of creating your own launcher is the complete control you have over every aspect of its functionality and appearance. However, this approach requires a solid understanding of programming languages, software development, and the Minecraft modding ecosystem.
Coding a Custom Mod Launcher:
- Programming Languages: Knowledge of languages such as Java, C++, or Python is essential, as these will be used to write the core functionality of your launcher.
- Integrated Development Environment (IDE): Tools like IntelliJ IDEA, Eclipse, or Visual Studio provide the environment needed to write and test your code.
- User Interface Design: Familiarity with UI/UX design principles and tools like Qt or JavaFX to create a visually appealing and user-friendly interface.
- Dependency Management: Libraries and tools like Maven or Gradle to handle dependencies and ensure compatibility with different Minecraft versions and mods.
- Networking: Understanding of networking principles to enable features like mod downloads, updates, and server connections.
Using Game Launcher Creator:
- Drag-and-Drop Interface: Simplifies the design process, allowing you to create a professional-looking launcher without any coding.
- Pre-Built Templates: Offers a variety of templates that can be customized to fit your needs.
- Integrated Features: Includes built-in support for common launcher features such as update checks, mod management, and server connectivity.
- Extensive Documentation and Support: Provides comprehensive guides and support to help you create and troubleshoot your launcher.
As you can see, the pros of using Game Launcher Creator V3 (GLCV3) far outweigh the pros of using a custom development environment and programming.
Here are the basic steps involved in developing your own Minecraft mod launcher.
- Planning and Design: Outline the features you want in your launcher, design the user interface, and plan the overall structure of your application.
- Set Up Development Environment: Install and configure your IDE, set up version control (e.g., Git), and organize your project directory.
- Develop Core Features: Write the code for essential functions like mod installation, update checks, and server connections.
- User Interface Implementation: Design and implement the UI, ensuring it’s intuitive and user-friendly.
- Testing and Debugging: Thoroughly test your launcher to identify and fix bugs, ensuring compatibility with various mods and Minecraft versions.
- Deployment: Package your launcher for distribution, providing easy installation and update mechanisms for users.
Using Game Launcher Creator:
- Choose a Template: Start with a pre-built template that fits your needs or create your own design from scratch using the drag-and-drop interface.
- Customize the Interface: Use the intuitive tools to customize the look and feel of your launcher, adding buttons, images, and other elements.
- Add Features: Integrate essential features like mod management, update checks, and server connections using built-in options.
- Test Your Launcher: Use the provided tools to test your launcher and ensure everything works as expected.
- Publish and Share: Export your launcher and share it with your community, making it easy for others to install and use.
So as you can see the differences of coding and using a tool like GLCV3, it’s a no-brainer really and that’s why GLCV3 has over 8000 users worldwide to date.
Here’s a list of Pros and Cons of Coding vs Game Launcher Creator.
Coding
Pros:
- Complete control over every aspect of the launcher’s functionality and design.
- Ability to implement highly specialized features tailored to your specific needs.
- Deep understanding and learning experience in software development and game modding.
Cons:
- Time-consuming and requires significant programming knowledge.
- Higher potential for bugs and compatibility issues, which can be challenging to troubleshoot.
- More complex and involved setup and maintenance process.
Using Game Launcher Creator
Pros:
- User-friendly, drag-and-drop interface that requires no coding skills.
- Rapid development and deployment, allowing you to create a launcher in a fraction of the time.
- Built-in support and templates streamline the process, ensuring a professional and polished final product.
- Comprehensive documentation and support for troubleshooting and customization.
Cons:
- Limited to the features and customization options provided by the software.
- Less control over the underlying code and functionality.
- May not support highly specialized or niche requirements that custom coding can address.
As we’ve discussed here, building a custom mod launcher for Minecraft can be approached in two ways: coding it yourself for maximum control and customization or using a tool like Game Launcher Creator for a simpler, faster, and more user-friendly experience. Each method has its own set of advantages and drawbacks, so the best choice depends on your specific needs, skills, and resources.
Creating a custom mod launcher for Minecraft can be an intimidating task, especially for those without extensive coding experience. However, Game Launcher Creator (GLC) offers a solution that significantly simplifies the process. One of the standout features of GLC is its extensive and thorough documentation system, which includes both written and video tutorials. These resources ensure that users can maximize the potential of the software, regardless of their technical background. Furthermore, the vibrant and active community on Discord, boasting over 2000 users, provides an invaluable support network.
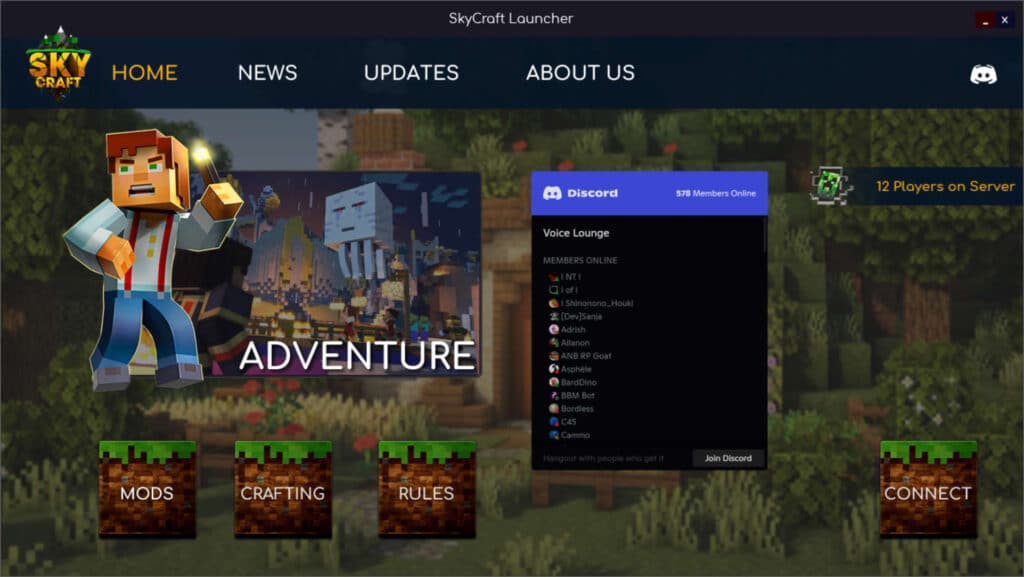
GLCV3 Minecraft Mod Launcher Development
Game Launcher Creator’s documentation is one of its greatest assets, meticulously designed to cover every aspect of the software. Whether you’re a beginner just starting out or an experienced developer looking to fine-tune your launcher, GLC’s documentation has you covered. The documentation is organized into several comprehensive sections, making it easy to find information on specific topics. Here are some key highlights:
- Written Tutorials: These step-by-step guides cover everything from basic setup to advanced customization. The tutorials are detailed and clear, providing screenshots and examples to ensure users can follow along easily. Topics include:
- Getting Started: An introduction to the software, installation instructions, and an overview of the user interface.
- Basic Launcher Creation: Tutorials on creating a basic launcher, adding buttons, images, and other elements.
- Advanced Features: Guides on implementing more complex features such as update checks, mod management, and server connectivity.
- Video Tutorials: For users who prefer visual learning, GLC offers an extensive library of video tutorials. These videos walk users through each step of the process, making it easier to understand and apply the information. The video tutorials are professionally produced and cover a wide range of topics, including:
- Designing the Launcher Interface: Tips and tricks for creating an appealing and user-friendly interface using the drag-and-drop editor.
- Integrating Features: How to add and configure essential features such as automatic updates and custom mod installations.
- Troubleshooting: Common issues and their solutions, helping users to quickly resolve any problems they encounter.
- FAQs and Troubleshooting Guides: The documentation also includes a comprehensive FAQ section and troubleshooting guides that address common questions and issues. This ensures that users can quickly find answers and solutions, minimizing downtime and frustration.
Vibrant and Supportive Discord Community
Beyond its stellar documentation, Game Launcher Creator boasts a vibrant and active Discord community. With over 2000 active users, the Discord server is a bustling hub of activity where users can share their creations, seek advice, and collaborate on projects. Here are some key benefits of joining the GLC Discord community:
- Real-Time Support: The Discord server provides real-time support from both the community and the GLC support/development staff. Whether you’re facing a technical issue or need advice on best practices, you can get immediate help from knowledgeable members.
- Community Collaboration: The active community is always willing to share their experiences and insights. Users often post tips, tricks, and tutorials, making it a great place to learn new techniques and discover creative solutions.
- Showcase and Feedback: The Discord server has dedicated channels where users can showcase their projects and get feedback. This is a fantastic way to get inspiration, improve your launcher, and see what others are creating with GLC.
- Regular Updates and Announcements: The development team regularly posts updates and announcements on Discord, keeping the community informed about new features, bug fixes, and upcoming releases. This ensures that users are always in the loop and can take advantage of the latest improvements.
- Events and Contests: The GLC Discord community often hosts events and contests, providing fun and engaging ways for users to showcase their skills and win prizes. These events foster a sense of camaraderie and encourage users to push the boundaries of what they can create with the software.
Game Launcher Creator is not just a powerful tool for building custom mod launchers; it’s also supported by an exceptional documentation system and a vibrant community. The extensive written and video tutorials ensure that users can effectively utilize the software, while the active Discord server provides invaluable support and a sense of community. Whether you’re a beginner or an experienced developer, GLC’s resources and community will help you create the perfect launcher for your Minecraft mods. It also supports third party plugin development so there’s an array of plugins already available and if you are a keen programmer, you can code your own plugins exclusively for GLC and even sell your plugin on the marketplace.
You can view more information about using GLCV3 for creating your own Custom Minecraft Mod Launcher here.
Popular Minecraft Mod Launchers
Mod Launchers have been around since Minecraft begun. They have been in development and circulation for many years and most of the popular ones are still updated and maintained. We will guide you through the most popular Minecraft mod launchers available.
Forge
Forge is one of the most popular and widely used mod loaders for Minecraft. It has become the go-to choice for modders and players alike, offering a robust and versatile platform that supports a vast array of mods. In this section, we’ll provide an overview of Forge, delve into its features, explain how to install and use it, and discuss its pros and cons.
Overview and Features
Forge was created to provide a reliable and compatible framework for Minecraft mods. Its primary function is to ensure that mods can be easily added, managed, and updated without conflicting with each other. Over the years, Forge has evolved into a comprehensive modding tool with a host of features designed to enhance the Minecraft experience.
Key Features:
- Compatibility: Forge is designed to ensure compatibility between different mods, reducing the likelihood of conflicts and crashes. This is achieved through a standardized modding framework that mod developers adhere to.
- Extensive Mod Library: Forge boasts one of the largest libraries of mods, covering everything from simple cosmetic changes to complex gameplay overhauls. This extensive selection means players can customize their Minecraft experience in countless ways.
- Mod Management: Forge provides tools for managing and organizing mods. Players can easily enable or disable mods, check for updates, and configure settings through a user-friendly interface.
- API for Mod Developers: Forge includes a powerful API (Application Programming Interface) that allows developers to create and integrate mods more easily. This API provides access to Minecraft’s underlying code, enabling the creation of sophisticated and feature-rich mods.
- Frequent Updates: Forge is regularly updated to ensure compatibility with the latest versions of Minecraft and to incorporate new features and improvements. This ongoing support helps maintain a stable and up-to-date modding environment.
Installation and Usage
Installing Forge is a straightforward process, but it does require a few steps to ensure everything is set up correctly.
Installation Steps:
- Download the Installer: Visit the official Forge website and download the installer for the version of Minecraft you wish to mod.
- Run the Installer: Launch the installer and select “Install client.” Ensure that the Minecraft directory is correctly specified. The installer will download and set up the necessary files.
- Launch Minecraft: Open the Minecraft launcher and select the Forge profile from the profile list. This profile is automatically created during the installation process.
- Verify Installation: Click “Play” to launch Minecraft with Forge. If the installation was successful, you will see a “Mods” button on the main menu.
- Install Mods: Download the desired mods (usually in .jar format) and place them in the “mods” folder located in the Minecraft directory. Relaunch Minecraft to load the mods.
Using Forge:
- Mod Management: Once Forge is installed, managing mods is simple. The “Mods” button on the main menu allows you to view installed mods, check for updates, and access mod-specific settings.
- Configuration: Many mods come with their own configuration files, which can be edited to customize their behavior. These files are typically found in the “config” folder within the Minecraft directory.
- Troubleshooting: If you encounter issues, Forge provides detailed error logs that can help identify the source of the problem. The active Forge community is also a valuable resource for troubleshooting and support.
Pros and Cons
Pros:
- Wide Adoption: Forge is the most widely used mod loader, ensuring a large selection of compatible mods and extensive community support.
- Comprehensive Modding Framework: The standardized framework reduces conflicts and enhances compatibility between mods.
- User-Friendly: The installation process and user interface are straightforward, making it accessible to both beginners and experienced modders.
- Developer-Friendly: The robust API and detailed documentation make it easier for developers to create and maintain mods.
- Regular Updates: Ongoing updates ensure compatibility with the latest versions of Minecraft and introduce new features.
Cons:
- Performance Overhead: Running multiple mods through Forge can sometimes impact game performance, particularly if the mods are resource-intensive.
- Complexity for Beginners: While the installation process is straightforward, configuring and troubleshooting mods can be challenging for new users.
- Dependency on Mod Updates: Mods need to be updated to maintain compatibility with new versions of Minecraft and Forge. If a mod is no longer maintained by its developer, it may become unusable.
- Learning Curve for Developers: Despite the comprehensive API, creating complex mods can have a steep learning curve for developers who are new to Minecraft modding.
Forge is an essential tool for anyone interested in modding Minecraft. Its extensive features, large mod library, and robust community support make it the preferred choice for both players and developers. While it has its challenges, particularly for beginners, the benefits far outweigh the drawbacks, making Forge a powerful and indispensable part of the Minecraft modding ecosystem.
Fabric
Fabric is a lightweight and modular modding toolchain for Minecraft that has quickly gained popularity due to its flexibility and ease of use. Designed as an alternative to Forge, Fabric focuses on providing a streamlined and efficient modding experience while offering high compatibility with various Minecraft versions. In this section, we’ll explore Fabric’s features, provide a step-by-step guide to installation and usage, and discuss its pros and cons.
Overview and Features
Fabric was introduced as a lightweight and modular modding platform aimed at providing an easy-to-use and flexible environment for both players and developers. Unlike Forge, which is feature-rich and more comprehensive, Fabric focuses on simplicity and speed, making it a preferred choice for many users who want quick updates and minimal performance overhead.
Key Features:
- Lightweight: Fabric is known for its lightweight design, which ensures minimal performance impact on the game. This makes it an excellent choice for players who want to add mods without significantly affecting gameplay performance.
- Modular Architecture: Fabric’s modular approach allows for greater flexibility. Mods can be updated and maintained independently, reducing the risk of conflicts and compatibility issues.
- Rapid Updates: Fabric is often updated quickly to support new Minecraft versions, ensuring that users can enjoy the latest game features and fixes without waiting long for compatibility updates.
- Fabric API: The Fabric API provides a set of tools and hooks that make mod development easier. This API is lightweight and modular, allowing developers to use only the components they need.
- Loader and Mod Manager: Fabric includes a mod loader and manager that simplifies the process of installing and managing mods, making it accessible to users with varying technical skills.
Installation and Usage
Installing and using Fabric is a straightforward process, designed to be user-friendly and quick. Here’s a step-by-step guide to get you started:
Installation Steps:
- Download Fabric Installer: Visit the official Fabric website and download the installer for your operating system.
- Run the Installer: Launch the Fabric installer and select the Minecraft version you want to mod. Ensure that the installation location matches your Minecraft directory.
- Install Fabric Loader: Click “Install” to install the Fabric loader. This step sets up the necessary files and configurations to run Fabric.
- Launch Minecraft: Open the Minecraft launcher and select the Fabric profile from the profile list. This profile is created automatically during the installation process.
- Install Fabric API and Mods: Download the Fabric API and any desired mods. Place these files in the “mods” folder located in your Minecraft directory.
- Run Minecraft: Launch Minecraft with the Fabric profile to load the mods.
Using Fabric:
- Mod Management: Fabric’s modular architecture allows you to easily add, remove, or update mods. Simply place the mod files in the “mods” folder and launch Minecraft.
- Configuration: Many Fabric mods come with configuration options that can be customized to enhance your gameplay experience. Configuration files are typically found in the “config” folder within the Minecraft directory.
- Troubleshooting: If issues arise, Fabric provides detailed logs to help diagnose problems. The active community and support forums are also excellent resources for troubleshooting and advice.
Pros and Cons
Pros:
- Lightweight and Efficient: Fabric’s minimalistic design ensures low performance overhead, making it ideal for users with less powerful hardware or those who want to maintain optimal game performance.
- Rapid Updates: Fabric is known for its quick updates, ensuring compatibility with the latest Minecraft versions shortly after their release.
- Modular and Flexible: The modular architecture allows for greater flexibility and independence in mod development and maintenance, reducing the likelihood of conflicts.
- Ease of Use: The installation process and user interface are straightforward, making Fabric accessible to beginners and experienced modders alike.
- Developer-Friendly: The Fabric API is designed to be lightweight and easy to use, making it a popular choice among mod developers.
Cons:
- Smaller Mod Library: Compared to Forge, Fabric has a smaller library of available mods. While this is growing, some users may find that certain mods they want are not yet available for Fabric.
- Less Feature-Rich: Fabric’s lightweight and modular design means it lacks some of the comprehensive features found in Forge, potentially limiting its functionality for certain advanced mods.
- Learning Curve for Developers: While the API is straightforward, developers used to Forge may need time to adapt to Fabric’s different approach and architecture.
- Community Size: The Fabric community, while active and supportive, is smaller compared to Forge’s. This can sometimes mean fewer resources and less immediate support.
Fabric offers a streamlined and efficient modding platform that excels in flexibility and performance. Its rapid update cycle and modular architecture make it a compelling choice for both players and developers looking for a lightweight alternative to Forge. While it has some limitations, particularly in terms of the mod library size and advanced features, Fabric’s benefits make it a worthy option for enhancing your Minecraft experience.
MultiMC
MultiMC is a powerful and versatile Minecraft launcher that provides an alternative to the default Minecraft launcher. Known for its user-friendly interface and robust feature set, MultiMC allows users to manage multiple Minecraft instances with ease. In this section, we’ll explore MultiMC’s features, guide you through its installation and usage, and discuss its pros and cons.
Overview and Features
MultiMC is designed to make managing multiple Minecraft installations simple and efficient. It provides a host of features that cater to both casual players and advanced users, making it one of the most popular third-party launchers available. Here are some of the key features that make MultiMC stand out:
Key Features:
- Multiple Instances: MultiMC allows users to create and manage multiple Minecraft instances. Each instance can have its own set of mods, resource packs, and configurations, making it easy to switch between different setups without conflicts.
- Mod Management: MultiMC simplifies the process of installing and managing mods. Users can easily add, remove, and update mods for each instance, ensuring compatibility and reducing the risk of conflicts.
- Version Control: MultiMC supports all Minecraft versions, from the earliest alpha builds to the latest releases. Users can create instances for different versions, making it easy to test new updates or play older versions.
- Customization: Users can customize each instance with different Java settings, memory allocations, and game configurations. This level of customization helps optimize performance and tailor the game experience to individual preferences.
- Integrated Development Environment (IDE) Support: MultiMC supports integration with popular development tools, making it a valuable tool for mod developers who need to test their creations across different Minecraft versions and configurations.
- Import and Export: MultiMC allows users to import and export instances, facilitating easy sharing and backup of custom setups. This feature is particularly useful for content creators and server administrators.
- Log Management: MultiMC provides detailed logs for each instance, aiding in troubleshooting and debugging. Users can easily access and share logs to get support from the community or diagnose issues.
Installation and Usage
Installing and using MultiMC is straightforward, and the launcher is designed to be accessible to both beginners and experienced users. Here’s a step-by-step guide to get you started:
Installation Steps:
- Download MultiMC: Visit the official MultiMC website and download the version for your operating system (Windows, macOS, or Linux).
- Extract the Files: Extract the downloaded archive to a desired location on your computer. MultiMC does not require installation; it can be run directly from the extracted folder.
- Launch MultiMC: Open the MultiMC folder and run the executable file (MultiMC.exe on Windows). The launcher will start and prompt you to select a language and configure initial settings.
- Add Minecraft Account: Click on the “Profiles” button and add your Minecraft account credentials. MultiMC supports both Mojang and Microsoft accounts.
- Create an Instance: Click the “Add Instance” button to create a new Minecraft instance. You can select the Minecraft version, name the instance, and customize its settings.
- Install Mods and Resource Packs: Right-click on the instance and select “Edit Instance” to open the instance settings. Here, you can add mods, resource packs, and configure other settings.
- Launch the Instance: Once your instance is configured, select it and click the “Launch” button to start Minecraft with the specified settings.
Using MultiMC:
- Instance Management: MultiMC’s main interface allows you to view and manage all your instances. You can easily switch between instances, edit settings, and monitor instance-specific logs.
- Customization: Customize each instance by adjusting Java settings, memory allocations, and game configurations to optimize performance and tailor the gameplay experience.
- Updating and Importing: MultiMC makes it easy to update Minecraft versions and mods for each instance. You can also import instances from other users or export your setups for sharing and backup.
Pros and Cons
Pros:
- User-Friendly Interface: MultiMC’s intuitive interface makes it easy to manage multiple instances, even for beginners.
- Extensive Mod Support: The launcher’s robust mod management capabilities simplify the process of adding, removing, and updating mods.
- Customization and Optimization: Users can customize each instance’s settings to optimize performance and tailor the gameplay experience.
- Version Flexibility: MultiMC supports all Minecraft versions, making it easy to switch between different versions for testing or nostalgic gameplay.
- Development Tools Integration: The launcher’s support for IDE integration makes it a valuable tool for mod developers.
- Community and Support: MultiMC has a strong community and provides detailed logs for troubleshooting, making it easier to get support and diagnose issues.
Cons:
- Manual Configuration: While MultiMC is user-friendly, it requires manual configuration of instances, which can be time-consuming for users who prefer a more automated approach.
- Limited Automation: Unlike some other launchers, MultiMC does not automatically update mods or Minecraft versions, requiring users to manage updates manually.
- Learning Curve: For users new to Minecraft modding, the variety of options and settings in MultiMC might be overwhelming at first.
- No Integrated Marketplace: MultiMC does not include an integrated mod marketplace, meaning users need to source and download mods from external websites.
MultiMC is a powerful and versatile Minecraft launcher that excels in managing multiple instances and providing extensive customization options. Its user-friendly interface, robust mod support, and flexible version control make it an excellent choice for both casual players and advanced users. While it requires manual configuration and lacks some automation features, its benefits far outweigh these minor drawbacks, making MultiMC a top choice for enhancing and managing your Minecraft experience.


