If you’ve ever been to a kid’s birthday party in the past few years, there’s a good chance you’ve encountered the pixelated charm of a Minecraft-themed celebration. My nephew, for instance, recently turned eight, and the entire house was transformed into a blocky wonderland. Creeper balloons, Steve cut-outs, and even a giant Enderman piñata greeted the guests. It’s not just the kids who love it; parents get into the spirit too, reminiscing about their own gaming adventures or joining in to help build epic structures with Minecraft cake blocks.
Minecraft, with its endless creative possibilities and simple yet captivating graphics, provides a perfect theme for parties. It’s a game that has transcended age groups, appealing to both young players who are just discovering its wonders and adults who enjoy the nostalgic, Lego-like building experience. The sandbox nature of Minecraft means that every party can be as unique as the player’s imagination, which is part of the fun!
I remember the first time I saw a Minecraft-themed cake at a party. The cake was a multi-tiered masterpiece, with each layer representing different biomes from the game – the Overworld, the Nether, and even the End. It was like a journey through the game itself, and the kids were absolutely thrilled, pointing out their favourite elements and characters. The popularity of these themed parties isn’t just about the game itself, but also about the way Minecraft encourages creativity and collaboration. Whether it’s building a fortress together, embarking on an epic quest, or simply surviving the night against creepers, Minecraft brings people together. This sense of community and shared adventure translates beautifully into party planning, making every detail, from decorations to the cake, an opportunity to bring the game to life.
So, if you’re considering a Minecraft-themed party, you’re in good company. It’s a theme that promises fun, creativity, and a lot of happy memories – plus, who doesn’t love an excuse to dive into some pixelated fun, right? Keep reading, and we’ll guide you through creating a Minecraft cake that will be the star of your next party.
Ingredients and Recipes for Minecraft Cakes
There’s a wealth of online tutorials for cake mixtures, however, Minecraft cake recipes have to be on the ball, so to speak. Don’t get me wrong, you can still use your existing cake making experience or combine other recipes online for your initial cake mixtures, but here we will provide you with a good little tutorial on how to create your own from scratch and add a little sass to it.
Basic Cake Mixtures
The foundation of any great cake starts with a solid, dependable cake mixture. For a Minecraft cake, you want something that’s not only delicious but also sturdy enough to hold its shape when you’re creating those iconic blocky designs. Classic choices include vanilla sponge, chocolate cake, and red velvet. These flavours are crowd-pleasers and provide a nice contrast to the vibrant decorations you’ll be adding.
Here’s a simple vanilla sponge recipe to get you started…
- Ingredients:
- 200g unsalted butter, softened
- 200g caster sugar
- 4 large eggs
- 200g self-raising flour
- 1 tsp vanilla extract
- 2 tbsp milk
- Instructions:
- Preheat your oven to 180°C (350°F) and grease your cake tins.
- Cream the butter and sugar together until light and fluffy.
- Beat in the eggs one at a time, adding a spoonful of flour with each egg to prevent curdling.
- Fold in the remaining flour and add the vanilla extract and milk.
- Divide the mixture between the tins and bake for 20-25 minutes until golden and springy to the touch.
This basic mixture can be adapted with different flavours or food colourings to match your Minecraft theme. Chocolate cake works great for “dirt” blocks, while red velvet can represent the game’s redstone.
Fondant and Icing Techniques
Once your cakes are baked and cooled, it’s time to bring them to life with fondant and icing. Fondant is perfect for achieving that smooth, pixelated look of Minecraft blocks. You can buy pre-coloured fondant or tint white fondant with gel food colouring to get the perfect shades.
Here’s how to work with fondant and icing:
- Rolling and Covering:
- Dust your work surface with powdered sugar to prevent sticking.
- Roll out the fondant to about 1/4-inch thickness.
- Carefully drape the fondant over your cake, smoothing it down with your hands or a fondant smoother to remove any air bubbles.
- Cutting Shapes:
- Use a ruler and a sharp knife or pizza cutter to cut out block shapes.
- Layer different colours to create the Minecraft pixel effect.
For finer details, royal icing is your friend. It’s great for drawing on intricate designs like Creeper faces or Steve’s armour. Mix icing sugar with a small amount of water or lemon juice to your desired consistency, then pipe away using fine-tipped piping bags.
Unique Ingredients for a Minecraft Twist
To really wow your guests, consider incorporating some unique ingredients that add both flavour and a nod to Minecraft. Here are a few ideas:
- Cocoa Nibs and Crushed Oreos:
- These can mimic the look of coal or obsidian blocks and add a delightful crunch to your cake.
- Edible Gold Leaf:
- Perfect for creating those rare and valuable gold blocks, adding a touch of luxury and sparkle.
- Matcha Powder:
- This green tea powder not only gives a vibrant colour but also a unique flavour, perfect for grass blocks or Creeper elements.
- Fruit Fillings:
- Incorporate raspberry or strawberry jam for a surprise “redstone” centre in your cake layers.
- Honeycomb Pieces:
- These can represent Minecraft’s beehives or honey blocks and add a sweet, crunchy texture.
By combining these unique ingredients with traditional cake elements, you can create a dessert that’s both a feast for the eyes and the taste buds. Your Minecraft cake will be the talk of the party, not just for its look, but for its deliciously creative flavours too.
Creative Minecraft Cake Designs
The design of your Minecraft cake can be as simple or as complex as you’d like it to be, just like the game really 🙂
The choice is entirely yours and hopefully the tips and guides I’m writing for you here will point you in the right direction to creating something awesome.
 Classic Minecraft Block Cake
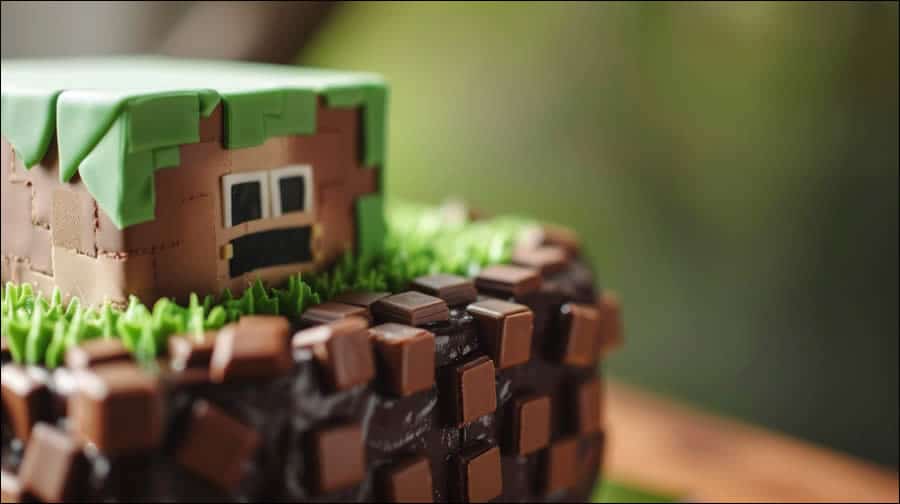
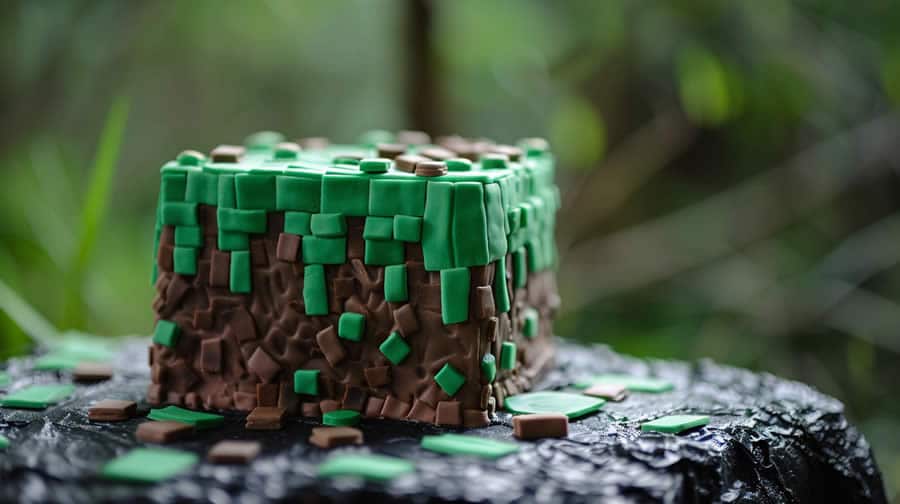
The classic Minecraft block cake is a favourite among fans for its simplicity and iconic design. Imagine a perfect cube, each side meticulously decorated to mimic the game’s pixelated blocks. These cakes are not only visually striking but also surprisingly easy to make.
Start with a sturdy square cake, baked in either chocolate, vanilla, or your preferred flavour. Once cooled, trim the edges to ensure it’s a perfect cube. Cover the cake with a base layer of fondant or buttercream in a neutral colour like brown or green, depending on the block you’re replicating.
Next, create the pixelated effect. This is where fondant really shines. Roll out different colours of fondant – green for grass, brown for dirt, grey for stone – and cut them into small squares. Use a ruler to ensure uniformity, as consistency is key to achieving the Minecraft look. Arrange these fondant squares on the cake in a grid pattern, replicating the textures of the game. You can add more detail by shading with food colouring dust or edible markers to give your blocks a more authentic, in-game appearance.
Classic block cakes are versatile and can be stacked to create more elaborate structures, like towers or fortresses. They’re perfect for those who appreciate the aesthetic simplicity of Minecraft and want a cake that’s both easy to make and instantly recognizable.
 Creeper and Character Cakes
If you’re looking to add a bit of character to your cake, why not go for a Creeper or other beloved Minecraft characters like Steve or Alex? These cakes are sure to be a hit, especially with younger fans who love seeing their favourite characters come to life in edible form.
For a Creeper cake, start with a rectangular cake base. Carve it to shape if needed, then cover it with green fondant. Use black fondant squares to create the Creeper’s face – two small squares for the eyes and a larger, centred square with an attached rectangular piece for the mouth. To add depth, you can use various shades of green fondant squares to mimic the pixelated skin texture.
Character cakes like Steve or Alex are a bit more intricate. These usually involve multiple layers to build up the character’s body and head. Once you have your cake layers stacked and carved to the basic shape, cover them with fondant in the appropriate colours – blue for Steve’s pants, brown for his hair, etc. Use edible markers or icing to add finer details like eyes, mouth, and clothing textures.
These character cakes are not just visually appealing but also offer a fun challenge for those who enjoy detailed cake decorating. Plus, they make for fantastic centrepiece cakes that will delight any Minecraft fan.
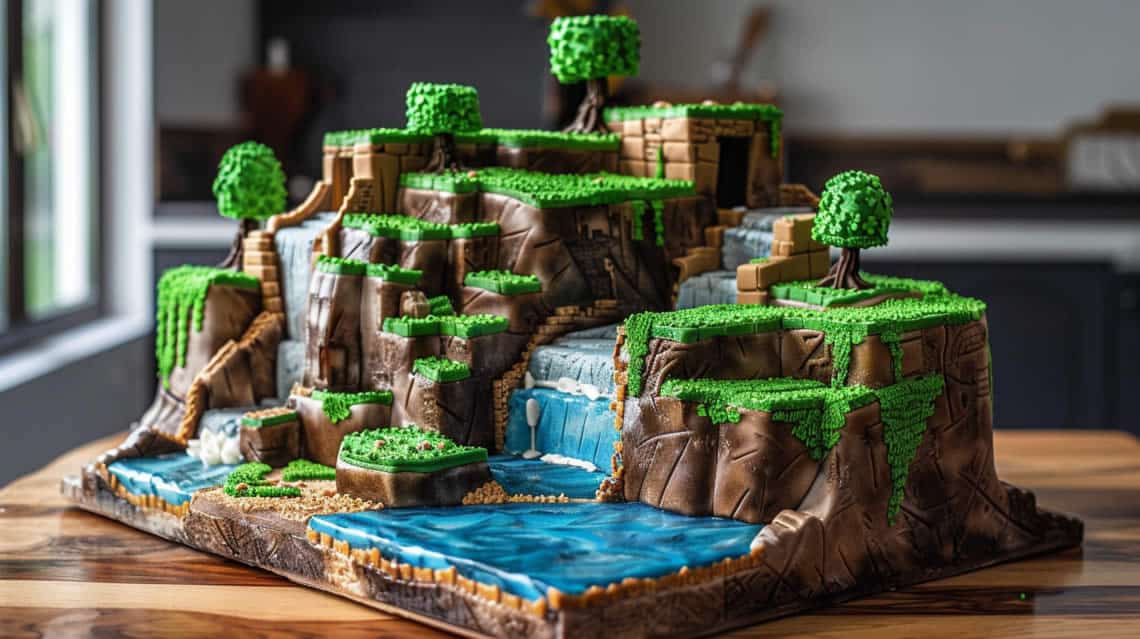
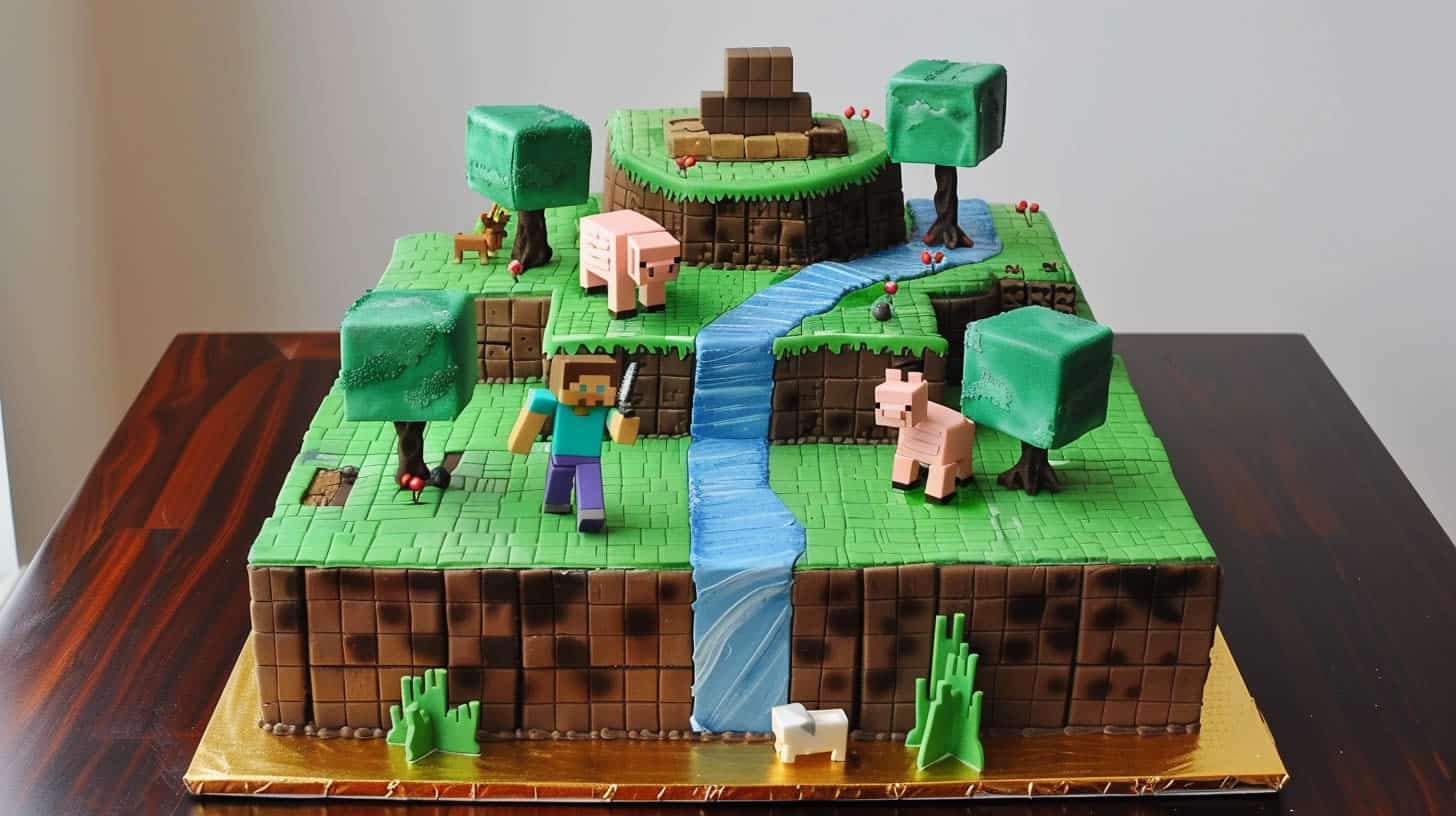
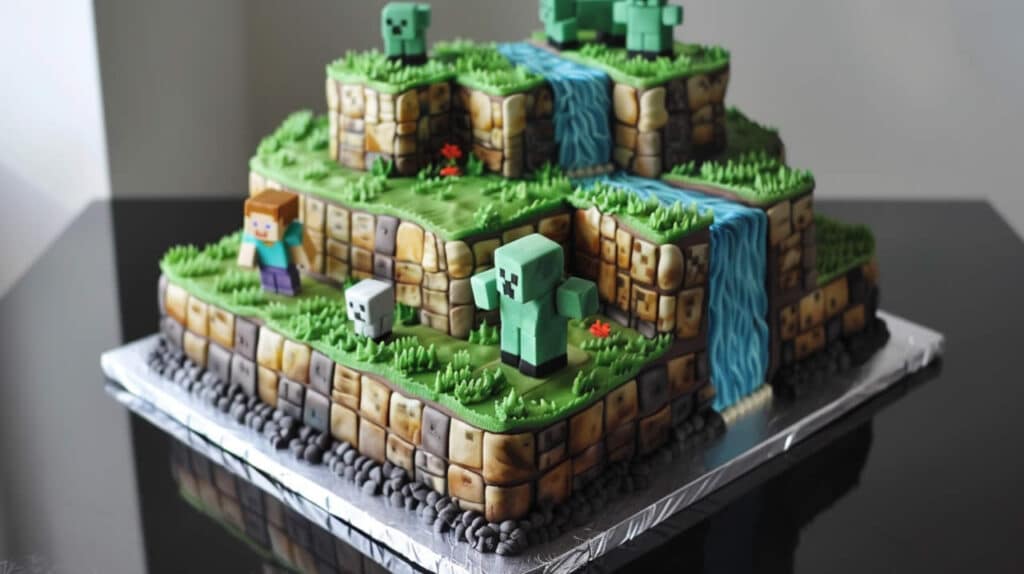
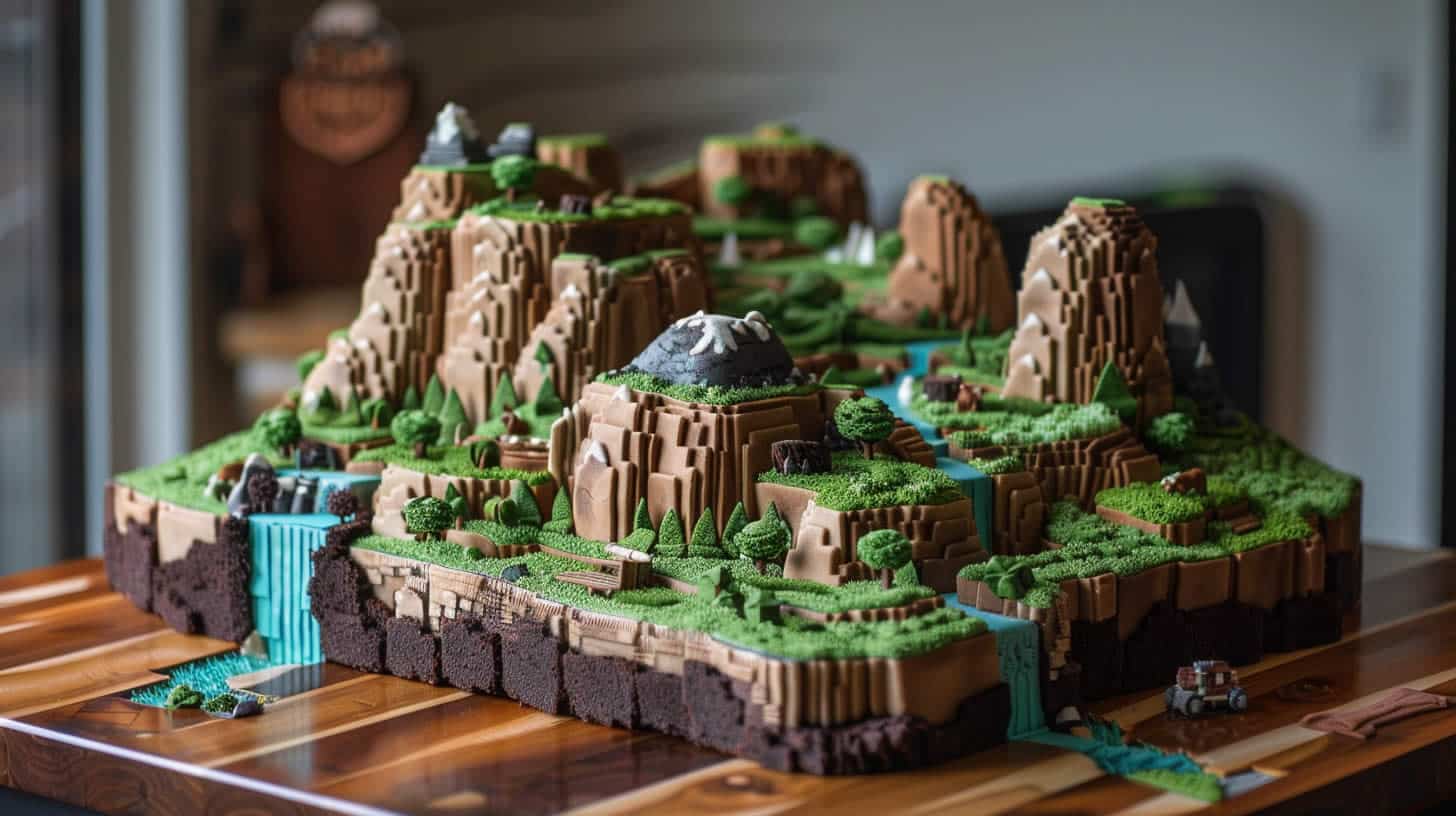
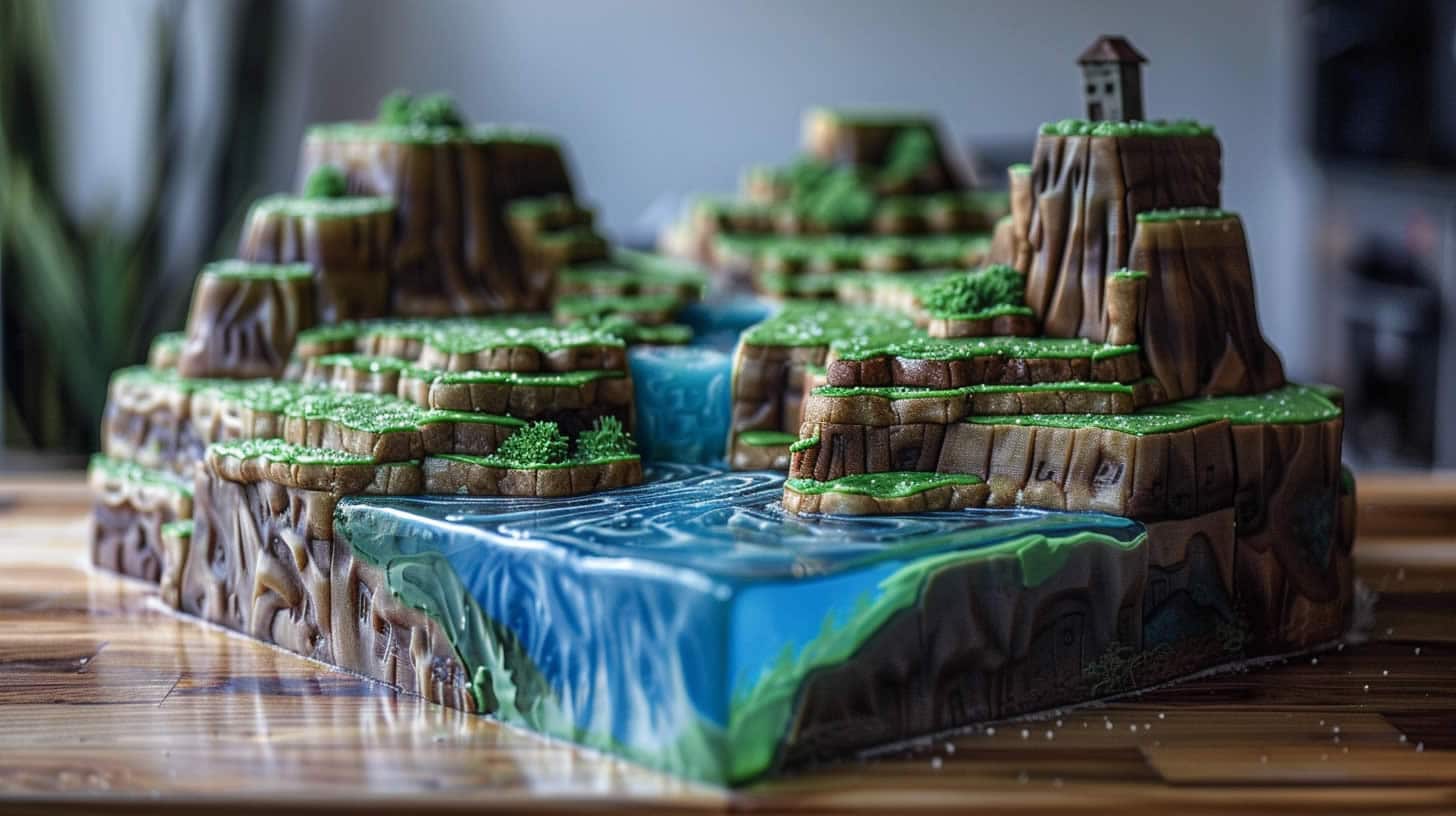
Landscape and Scene Cakes
For those who want to go all out, landscape and scene cakes offer a chance to create an edible Minecraft world. These cakes can be as simple or as complex as you like, allowing for endless creativity and customization.
Start by baking several sheet cakes, which will form the base of your landscape. These can be stacked and carved to create hills, valleys, and other terrain features. Cover the cakes with fondant or buttercream in earthy tones – green for grass, brown for dirt, and blue for water.
Next, add details to bring your scene to life. Use fondant to create miniature trees, animals, and characters. You can even add small candies or edible rocks to enhance the landscape. For water features, blue gel icing or clear piping gel works wonders, creating a realistic, glossy effect.
One popular idea is to create a cake that depicts a Minecraft village or an adventurous scene like a battle with zombies or a treasure hunt. Use rice crispy treats covered in fondant to add structures like houses, temples, or fortresses. Incorporate edible figurines of Minecraft characters engaged in various activities.
These landscape cakes are not just cakes; they’re entire edible dioramas that tell a story. They’re perfect for big celebrations where you want to make a grand impression. Plus, they offer plenty of surface area to play with different flavours and fillings, ensuring that the cake tastes as good as it looks.
Props and Decorations for the Perfect Minecraft Cake
Editable Props
Edible props are a fantastic way to enhance the visual appeal of your Minecraft cake while keeping everything deliciously consumable. They add layers of detail and interest, transforming a simple cake into a Minecraft masterpiece.
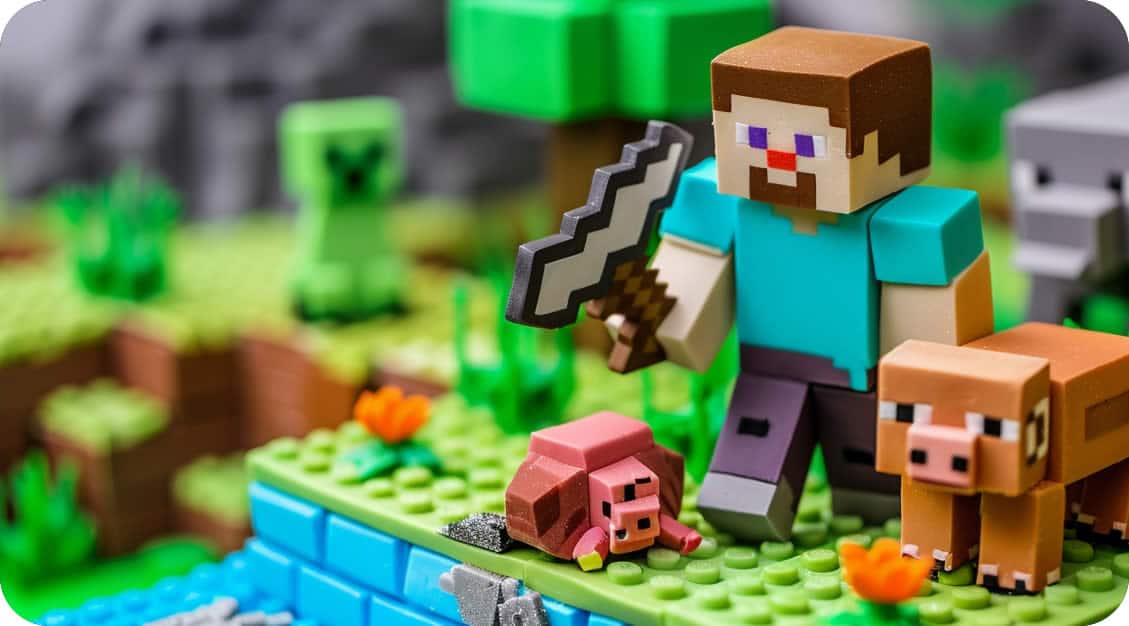
One of the most exciting edible props you can add to your cake are characters and animals from the game. You can use fondant, marzipan, or modelling chocolate to sculpt figures like Steve, Alex, Creepers, Endermen, or even animals like pigs and sheep. For those less confident in their sculpting skills, edible toppers can be bought online. These are pre-made, intricately detailed figures that you simply place on your cake.
Creating mini-blocks out of fondant or chocolate can add a multi-dimensional look to your cake. Use fondant to create smaller versions of common Minecraft blocks such as dirt, stone, grass, and wood. Arrange these around your main cake to create small structures like houses, trees, or even a mini-cave entrance. You can use rice crispy treats coated in fondant to create larger, more intricate structures like castles or temples.
Add edible vegetation like trees, bushes, and flowers using green-tinted fondant or gum paste. Trees can be made by forming trunks from pretzel sticks or chocolate-covered sticks, then attaching green fondant leaves. For bushes, simply roll green fondant into small, uneven shapes. Flowers can be created using small, coloured fondant cut-outs. Use crushed graham crackers or brown sugar to create dirt paths and sprinkle coconut flakes dyed green for grass.
If your cake design includes lakes or rivers, create these using blue gelatine or piping gel. These substances are not only edible but also give a realistic water effect. Blue-tinted sugar crystals can be sprinkled around the edges to mimic the look of water’s edge or waves.
Incorporate these props into the main cake design to tell a story. For example, place a Steve figure mining a chocolate “coal” block or a Creeper hiding behind a sugar “tree.” The key is to integrate these elements seamlessly to enhance the theme and narrative of your cake. While edible decorations are ideal for a fully immersive experience, non-edible decorations can add a level of detail and sophistication that might be challenging to achieve otherwise. They also provide keepsakes that can be cherished long after the cake is gone.
Non-Edible Props
While edible decorations are ideal for a fully immersive experience, non-edible decorations can add a level of detail and sophistication that might be challenging to achieve otherwise. They also provide keepsakes that can be cherished long after the cake is gone.
Printed toppers made from cardboard or plastic can depict detailed scenes from Minecraft that are hard to recreate with icing. These can include character figures, block designs, and even entire landscapes. Place these around the cake or use them as centrepieces on multi-tiered designs. They’re easy to use and can be found online or customized to fit your specific theme. Decorative picks and banners can add height and interest to your cake. Use toothpicks or small skewers to attach tiny paper or plastic flags that spell out “Happy Birthday” or feature Minecraft symbols. These can be inserted into the top of the cake or around the edges to create a festive look.
To create a complete scene, consider adding non-edible background elements. This could be a printed backdrop that depicts a Minecraft landscape, which can be placed behind the cake. You can also use small toy blocks to create a perimeter around the cake, giving it a Minecraft world setting. Incorporating battery-operated LED lights can bring your Minecraft cake to life. Use them to illuminate caves, create glowing ores, or even simulate a lava effect with red and orange lights. These lights can be discreetly hidden within the cake structure or around it to add a magical touch.
High-quality plastic or resin figurines of Minecraft characters can be used as cake toppers. These toppers not only look fantastic but can also serve as toys or keepsakes after the event. They’re durable, detailed, and can be reused for future cakes or as collectible items. Extend the Minecraft theme to your serving accessories. Use plates, napkins, and cutlery that match the Minecraft aesthetic. You can find themed party supplies online or at party stores that enhance the overall presentation of your cake and create a cohesive party atmosphere.
Presentation Tips and Tricks
The presentation of your Minecraft cake is just as important as the cake itself. Proper presentation can elevate your cake from a delicious dessert to a show-stopping centrepiece.
Here are my top 8 tips for presenting your final Minecraft Cake.
1. Cake Stands and Bases
Choosing the right cake stand can make a huge difference. Opt for a sturdy, wide cake stand that complements your Minecraft theme. Wooden stands or those with a rustic, earthy look can enhance the overall presentation. You can also create a custom base by covering a board with green fondant or paper to mimic the look of grass or dirt blocks.
2. Layering and Tiering
If you’re making a multi-layer or tiered cake, make sure each layer tells part of the Minecraft story. The bottom tier could represent the ground level, with dirt and grass blocks, while higher tiers could depict caves or sky elements. Use supports and dowels to ensure stability, especially for taller cakes.
3. Scene Setting
Enhance the setting around your cake with themed props. Surround your cake with toy Minecraft blocks, figurines, and other related items. Create a scene that complements the cake’s design, such as a mining area, a village, or an adventure setting.
4. Incorporate Movement
Adding elements of movement can make your cake truly dynamic. Small battery-operated fans can create the illusion of wind in trees or flowing water. Moving parts, such as a rotating platform, can showcase different sides of your cake if it has intricate designs all around.
5. Display Height and Angles
Place your cake on a display that raises it to eye level for easier viewing and admiration. Consider the angles from which guests will view the cake and ensure all sides are decorated if it will be viewed in the round. Use platforms or risers to add height and drama.
6. Complementary Colours and Lighting
Pay attention to the colours around your cake display. Use tablecloths, background materials, and lighting that enhance the colours of your cake. Soft, ambient lighting can highlight the cake’s features, while coloured lights can add thematic elements like a red glow for a Nether-themed cake.
7. Interactive Elements
Consider adding interactive elements to your cake presentation. Small toy figures or edible elements that guests can move or interact with can make the display more engaging. This is especially fun for children’s parties where guests can feel part of the Minecraft world.
8. Final Touches
Add final touches like edible glitter, sprinkles, or small candies to enhance the overall look of the cake. These little details can catch the light and add sparkle, making your cake even more eye-catching.
Proper presentation can turn your Minecraft cake into a true centrepiece that captures the imagination of all your guests. With these tips and tricks, your cake will not only taste great but also leave a lasting impression.
Ideas for Minecraft Cakes
Here we have collated a series of the best Minecraft cake ideas ever created. These cakes have been hand-made by ourselves and local companies around us.
Your imagination is your only limitation and your first cake might not even be your best. Learn, use trial and error and keep on baking whilst improvising.
If you have made any Minecraft Cakes yourself and would like us to feature an image of it here, please contact us, send us an email and attach a photo!
I hope you enjoyed reading my guide with tips and tricks for creating your own Minecraft cakes.
If your child is an avid Minecraft fan and they have their own Minecraft server, then how about treating them to our software, where they can build their own custom Minecraft mod launchers with no programming at all!